Roamer 230SB and seat base modifications

EAN

Senior Member
VIP Member
T6 Guru
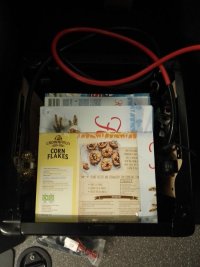
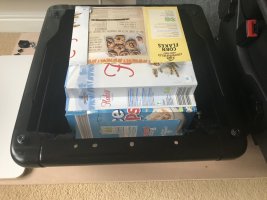
I’ve mocked up a dummy space model of a Roamer 230SB out of empty cereal packets (cheaper than making an expensive purchasing mistake).
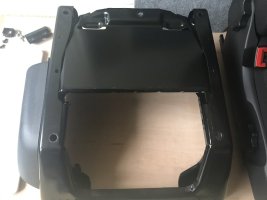
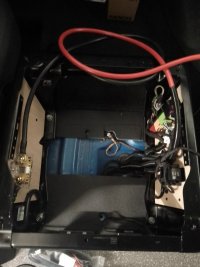
It is never going to fit in the passenger seat base unless I totally remove the lumpy factory 2nd battery tray which I think is spot welded in place; I can see a small number of circular indents which I assume are spot welds? What’s the process for removing? Is it just drill them out?
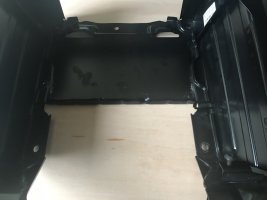
IMG_0862.jpeg

IMG_0863.jpeg

IMG_0864.jpeg
 
Looks like it's a case of drill out the spot welds or get the angle grinder and cut it off. ?

My battery plate in the double passenger bench was bolted in so it was quite easy to remove.
 
  • Like
Reactions: EAN
Battery plate now seperated.
6 spot welds: I centre punched, drilled a 3mm pilot drill, then followed with a 7mm drill which was enough to gently ”break” what remained of the welds.
Nice, ..... a bit of black spray paint to seal the metal and your done
 
Nice, ..... a bit of black spray paint to seal the metal and your done
Good idea with regards painting the bare metal. Will do that.
Far from done though!!!
Currently working out how to get the OEM wiring, fuses, connectors and relay out of the way.
Taking inspiration from others on the forum: Plenty of info to digest.
Intending on only ordering the Roamer after I’m confident enough that I have a total way forward planned.
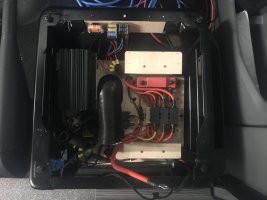
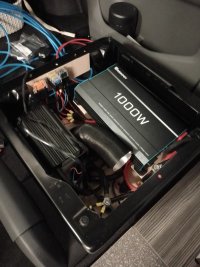
REDARC BCDC1240D DC-DC arrives later today; thats going under the drivers seat.
Still to choose an inverter (circa 1000W pure sine with remote switch) that can also fit under the drivers seat whilst missing the diesel heater ducting and I’m also waiting on a delivery of odds and sods to finish installing my Victron 15A mains charger behind a cupboard just above the rear offside wheel arch.
So much to think about and get right.
 
Progressing and it’s all going to fit, so I can now order the Roamer 230SB and finish off my install.
IMG_20231029_144039_007.jpegIMG_20231029_143758_734.jpegIMG_0874.jpegIMG_20231029_143840_182.jpeg
 
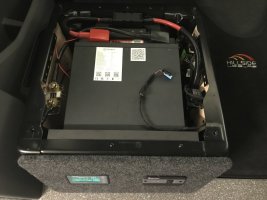
Looking at these photos, has me wondering if anyone has managed to get a roamer battery fitted when the seats are heated. To me it looks like the lead wont be long enough. Also the seat has to swivel giving more of a problem.

Thanks
 
Don’t have heated seats so can’t comment but my seats swivel fine. The wires on top of the battery in post #10 are plenty long enough, so it would depend upon the routing and length of the heated seat wiring in comparison.
 
Don’t have heated seats so can’t comment but my seats swivel fine. The wires on top of the battery in post #10 are plenty long enough, so it would depend upon the routing and length of the heated seat wiring in comparison.
Thanks. Guess its time to do a bit of Blue Peter and make a mock up and test.
 
There shouldn't be any issues with the heated seat/airbag wire, they're bundled together so if one reaches both will.

As for the swivel - that depends what swivel you have. The factory swivel on mine doesn't seem to reduce space at all. I've only got an OEM 75Ah battery but the only issue I see fitting a 230Ah seat base battery is the ground stud.
 
  • Like
Reactions: EAN
There shouldn't be any issues with the heated seat/airbag wire, they're bundled together so if one reaches both will.

As for the swivel - that depends what swivel you have. The factory swivel on mine doesn't seem to reduce space at all. I've only got an OEM 75Ah battery but the only issue I see fitting a 230Ah seat base battery is the ground stud.
Yes the ground stud is definitely a problem if you want to seat the battery down properly (which you should).
I had to shorten my passenger seat ground stud and didn’t use it for my battery install.
Instead I used a seat base stud, but they have a protective coating on them so I detailed what I did in the following thread:

Thread 'Seat base stud bolt GND connection'
Seat base stud bolt GND connection
Did you relocate the factory wiring going to the ground stud?

FYI I'm using one of the seat base studs as they come for my shunt ground and it's perfectly fine, my shunt reads in and out amps perfectly.
 
Did you relocate the factory wiring going to the ground stud?

FYI I'm using one of the seat base studs as they come for my shunt ground and it's perfectly fine, my shunt reads in and out amps perfectly.
Didn’t need to relocate the existing factory wiring going to the ground stud under the passenger seat; just had to cut the stud down and then change the nut to a non domed version. That was enough for it not to be a problem.
On my T6.1 the seat mounting studs were definitely coated with a non conductive coating and I wanted to make sure I had a really good large area of ground contact as I would be passing 100A+ through them.
 
Back
Top